
In this blog post, you'll learn my workflow for (shooting and) editing timelapses using Adobe apps. Adobe has kindly sponsored this post as part of a campaign for Earth Day. You can find out more about it on this post here.
Capturing a timelapse sequence
First of all, you need to capture a timelapse sequence, which isn't as complicated as most people think.
All you need is a camera that can shoot RAW photos and that allows you to dial in your aperture, shutter speed, and ISO value manually.

By the way, most modern smartphones can even work, as they allow you to dial in these settings manually too.
Turn off your lens stabilization and AutoFocus, find an interesting subject, frame up your shot, and make sure it's in focus.
Then I recommend using a 3-second interval as your shooting frequency. 3 seconds is a good average for capturing cloud movement, but feel free to experiment with shorter or longer intervals.

You can trigger the photos using your camera's menu system (look for a setting called ‘intervalometer' or ‘timelapse' or using an external controller. Then you want to shoot at least 300 photos, after which you'll finish the shot and offload your RAW photos to your hard drive.
Editing a timelapse sequence
Working from a solid-state drive will be faster and more efficient in many ways, so I definitely recommend an SSD over a HD.
Import the photos from your solid-state or hard drive to your Adobe Lightroom Classic catalog using the ‘Add' import method as shown below and make sure the timelapse photos are in one folder.

Select the first photo of the sequence and then add your color grade however you please. I often adjust the white balance, contrast, vibrance, and saturation only. I also recommend setting the ‘Treatment' to ‘Camera Landscape' if available. Not all cameras have this setting so don't worry about it if you can't find it.
Here is an example of a colour graded RAW file and the settings I changed in the Lightroom Develop module.


Once you're done colour grading your first photo you can copy and paste those settings onto the rest of the photos in the sequence. Do this by selecting them all with the first photo as the main selection and then clicking ‘Sync settings'. Alternatively, you can copy and paste settings from the first photo to the rest of the sequence.

Once the settings are synced or pasted to the rest of the sequence you want to select all the timelapse photos then right-click and select ‘Metadata > Save metadata to files'. This will generate so called sidecar files (you'll see them as .XMP files in the screenshot below) which hold all the information about the colour grade you just applied.
Then open Adobe After Effects and import the sequence you're working on as an ‘image sequence' like below.

Right-click the sequence in the Project tab and create a new composition from it like below.

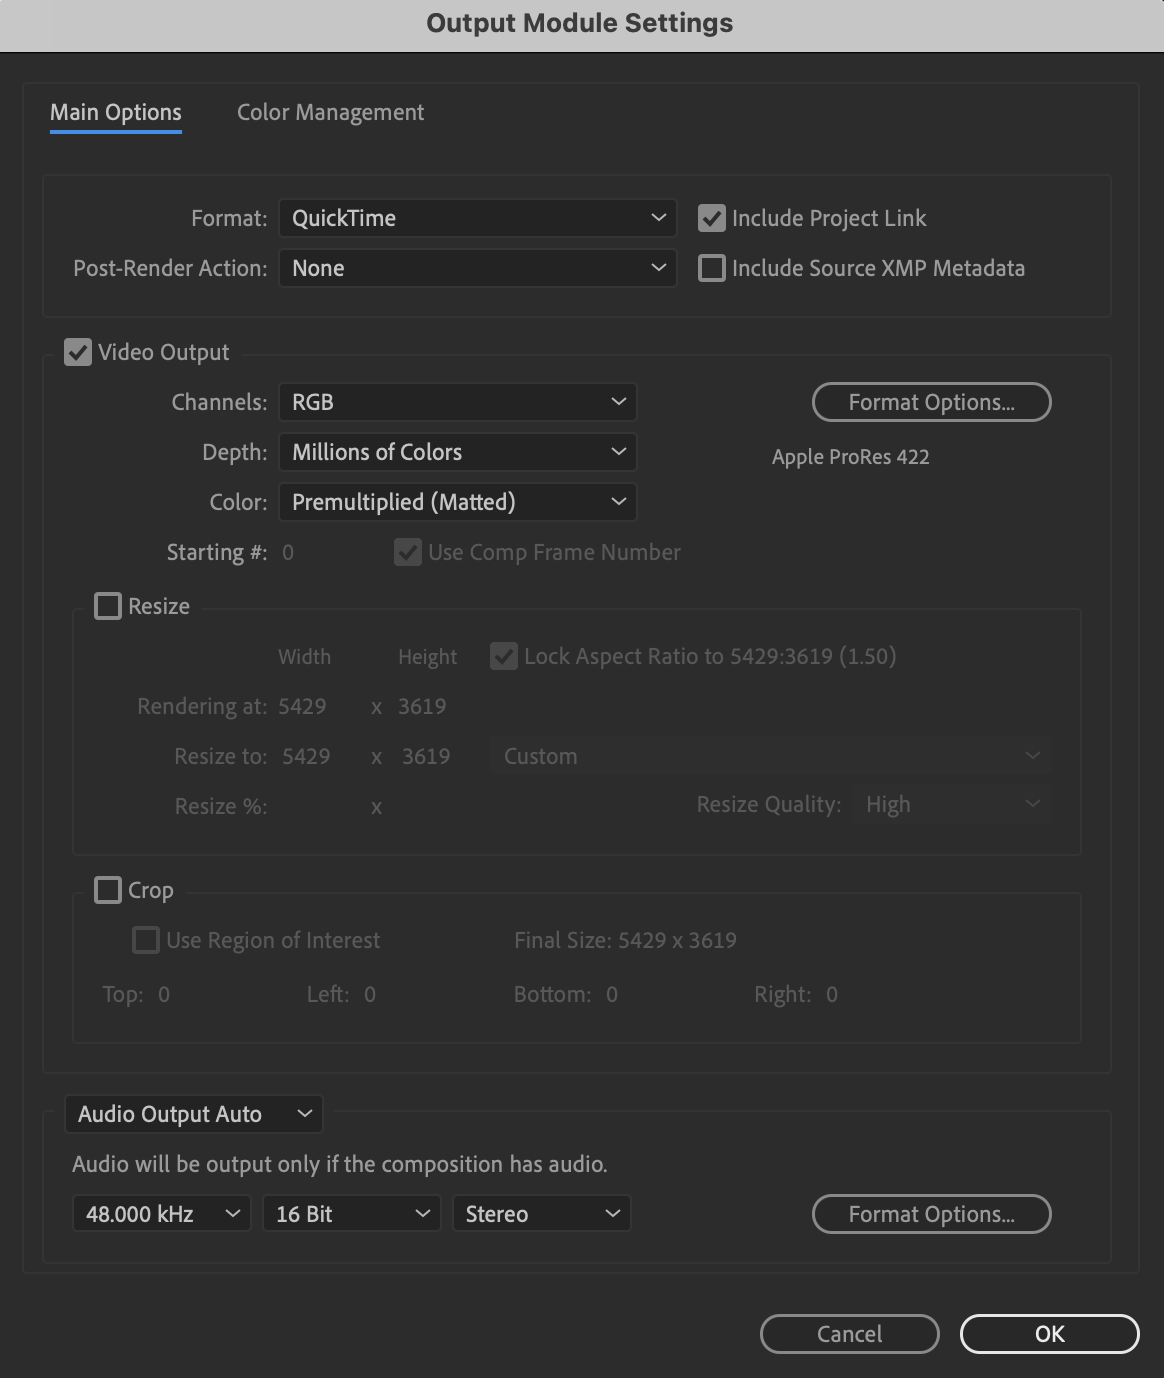
Then right-click the newly created composition and go to ‘File > Export > Add to render queue'. Select the full resolution and use the Apple ProRes 422 HQ codec for a high-quality result.

Below are the settings I use for the video export.

Once you hit the Render button in the render queue let Adobe After Effects render and in a little while (depending on your system this might take a long while), you'll have a high resolution, high quality timelapse video file!
Editing the timelapse using Adobe Premiere Pro
Now that you have your high resolution video file ready, you can get creative with it.
First of all, you need to import your footage into Adobe Premiere Pro, which you can do by dragging and dropping the files into the Project window or by going ‘File > Import'.
Then you need to create a sequence, in which we'll be putting our clips next to each other.

To achieve the vertical aspect ratio and resolution which will work for most social media apps these days you can use the following settings for the new sequence.

Drag your timelapse videos into the sequence and then in the Effects Control window adjust the scale and position of the clip accordingly. This scale and position will depend on the resolution of your timelapse video file but it should be pretty simple to figure out which percentage you need.

I then duplicate the timelapse clip on top of itself in the timeline by alt-clicking and dragging it upwards as seen above. I then apply a 180-degree rotation (in the Effects Control window) to the newly duplicated clip. I also apply the Flip effect which you can find in the Effects Browser window. Play with the position parameters for both clips so you get the mirrored effect.

Finally to bring your edit to the next level, you can add music and apply a speed ramp effect to your timelapse clips in sync with the beat. In your timeline, select the clips that are on top of each other, then right click and click ‘Nest…'. You will notice the two clips have now turned into one (so called nested) clip.

Select the newly nested clip in your timeline, go to the Effect Controls window and click the chrono icon next to speed under Time Remapping. Place your playhead wherever you want to add a keyframe and then click the oval button to create keyframes.

In the timeline, right-click the clip and select ‘Show clip keyframes > Time Remapping > Speed' Now drag the line between the keyframes up or down to manipulate the speed of that section in between the keyframes. Extend the blue (grey in the image below) handles to create a speed ramp effect if you want.

And that's it, you've just made a timelapse video from beginning to end!
If you would like to learn more about timelapse photography, check out my e-book The Ultimate Timelapse Guide. It features over 75 chapters teaching you everything you need to know about planning, shooting and editing world-class timelapse sequences.
Get all the best tools and techniques to become a great timelapse photographer.
- Master the art of timelapse in no time with The Ultimate Timelapse Course.
- Get the e-book The Ultimate Timelapse Guide.
- Build your passive income system with Passive Income For Creatives.


